
House Construction Quality Checklist: Civil Site Inspection Guide
Planning to Build or Renovate in Lucknow?
Get an itemized, locked-price BOQ quote and geotechnical guidance from our senior structural engineers within 2 hours.
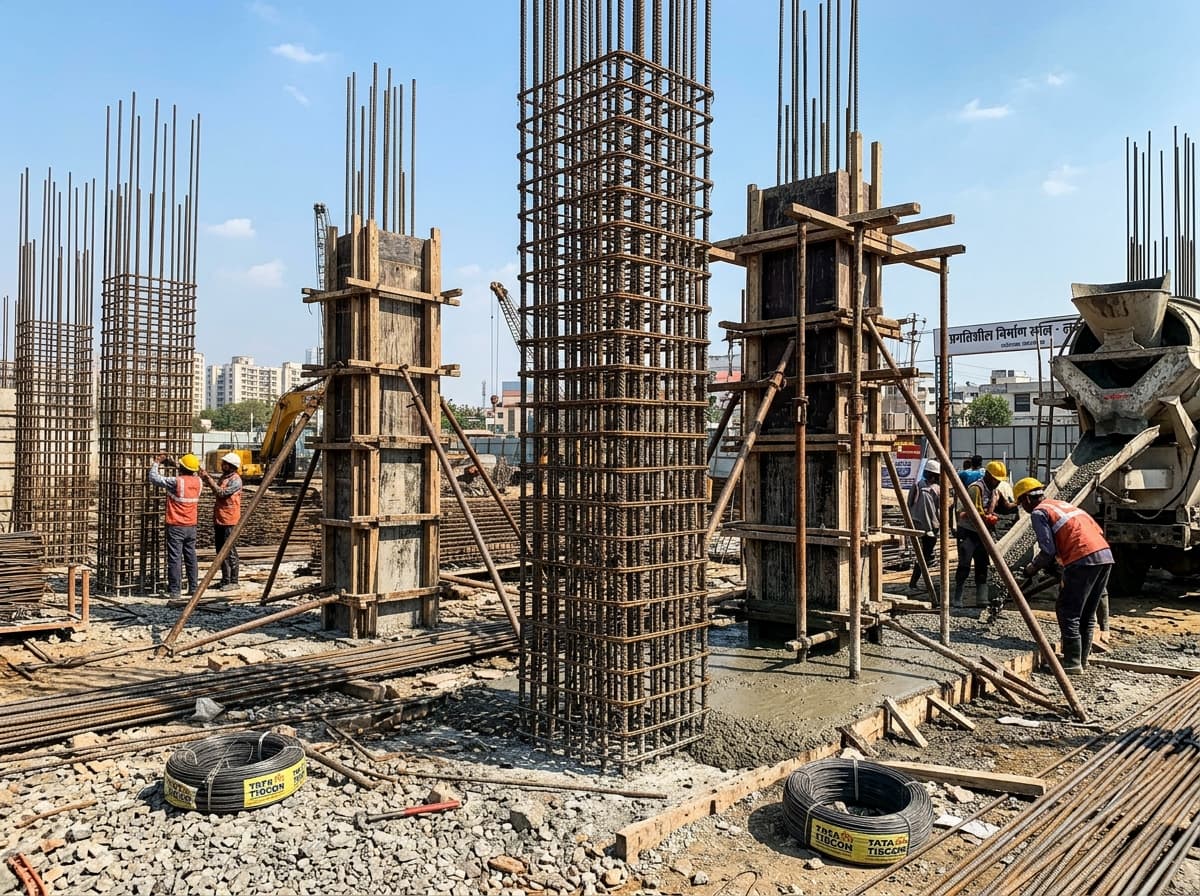
Building an independent house or villa is one of the largest financial investments a family will ever make. Yet, for most plot owners in Lucknow, visiting their active construction site can feel overwhelming. Masons, shuttering carpenters, and local contractors frequently throw around technical jargon, assure you that "everything is strong and first-class," and push for their next stage payment.
Unfortunately, cosmetic finishes like glossy vitrified tiles, designer false ceilings, and premium paint can easily disguise severe structural flaws underneath. In fact, over 80% of structural wall cracks, column honeycombing, slab sagging, and recurring dampness (*seelan*) observed in Lucknow residences are caused by basic engineering quality checks being skipped during the initial civil frame construction.
Whether you are self-managing your build or partnering with a turnkey contractor, you need a structured, field-tested house construction quality checklist. This comprehensive guide provides step-by-step civil work quality checks for house construction, outlining exactly how to check construction quality of a house at every critical stage—from initial soil excavation to roof slab casting and waterproofing—aligned with the Bureau of Indian Standards (IS Codes) and Lucknow's local soil conditions.
1. Soil, Excavation & Anti-Termite Treatment: Pre-Foundation Quality Checks
The strength of any residential structure begins deep below the ground. In Lucknow's alluvial plains—particularly in developing sectors around Sushant Golf City, Gomti Nagar Extension, Kisan Path, and Shaheed Path—soil strata vary significantly between loose sandy silt and compressible clay. Skipping sub-base preparation can lead to differential settlement, which creates diagonal cracks across brick walls.
Geotechnical & Excavation Inspection
1. Soil Bearing Capacity (SBC) Verification: Ensure your structural engineer has conducted a standard penetration test (SPT) or trial pit investigation. Lucknow residential footings typically require an SBC verification of at least 120 to 150 kN/m² before sizing column pads. 2. Trench Depth & Width: Measure foundation trenches against approved structural drawings. Never allow excavation to terminate in loose fill soil; trenches must reach firm, undisturbed virgin strata (typically 4 to 6 feet below natural ground level). 3. Bed Compaction: As part of your fundamental civil work quality checks for house construction, the excavated pit bed must be watered and compacted thoroughly using a plate compactor or heavy iron rammers (*durmut*) before placing the lean concrete bed.
Pre-Construction Anti-Termite Barrier (IS 6313 Part 2)
Subterranean termites (*deemak*) cause massive structural and interior damage in Uttar Pradesh. Surface spraying after the house is built is ineffective; chemical barriers must be injected into the soil during foundation stages: - Approved Chemical: Use Imidacloprid (30.5% SC) or Chlorpyrifos (20% EC) mixed to the manufacturer's exact emulsion ratio. - Stage 1 (Bottom & Sides of Trench): Spray the chemical emulsion along the bottom and vertical sides of foundation pits at a rate of 5 litres per linear meter of surface area before casting PCC. - Stage 2 (Plinth Backfill): As soil is backfilled inside the plinth walls, soak the top 300mm of backfilled earth with the chemical emulsion at 5 litres per square meter. - Stage 3 (Building Apron Perimeter): Inject chemical emulsion along the external plinth perimeter rod holes before constructing the exterior plinth protection walkway.
Plain Cement Concrete (PCC) Bed Check
- PCC Thickness: Verify a minimum 100mm (4 inches) of Plain Cement Concrete bed (M7.5 or M10 grade: 1:4:8 or 1:3:6 cement, coarse sand, and 40mm stone aggregate). - True Leveling: Use a spirit level or water-pipe level across the PCC bed. A flat, level PCC bed prevents eccentric point loads under reinforced concrete footings.
2. Foundation Footings & Plinth Beam Inspection (IS 456:2000)
Once the PCC bed cures, steel reinforcement cages and footing concrete are placed. When assessing how to check construction quality of a house during foundation works, rebar grade and placement are paramount. This phase forms the backbone of your building's seismic and load-bearing performance.
Footing Steel & Cover Block Quality Checks
- Primary Steel Quality: Inspect rebar manufacturer markings. Ensure all reinforcement bars are primary-producer TMT steel (e.g., Tata Tiscon, SAIL, or Jindal Panther Fe550D compliant with IS 1786). Avoid unbranded secondary re-rolled bars manufactured from scrap metal, which suffer from poor ductility and brittle breakage during seismic activity. - Mandatory 50mm Footing Cover Blocks: Steel rebar must NEVER touch the soil or rest directly on PCC. Ensure certified pre-cast concrete cover blocks of minimum 50mm thickness are tied beneath and on all sides of the footing reinforcement cage. Without cover blocks, groundwater moisture penetrates the concrete, causing the steel to rust, expand, and spall the concrete footing. - Centerline Alignment: Check column starter positions using diagonal string measurements from boundary reference points. Starter bars must align exactly with the architectural centerline drawings.
Plinth Beam & Tie Beam Inspection
Plinth beams tie all isolated columns together at ground level, preventing individual footings from shifting independently during ground moisture changes: - Stirrup (Ring) Spacing & Hook Details: Column and plinth beam stirrups must feature mandatory 135-degree seismic hooks (minimum 75mm hook extension) according to IS 13920 ductile detailing. Reject stirrups bent at simple 90-degree angles, as they unhook and burst open during seismic lateral loads. - Damp Proof Course (DPC): Cast a continuous 50mm thick concrete DPC band (1:1.5:3 mix) across all plinth walls, integrated with an approved liquid waterproofing compound. Once cured, apply two coats of hot bitumen primer topped with polythene sheet before laying the first course of masonry. This forms an impermeable barrier against capillary ground moisture rising into living room walls.
3. RCC Columns, Shuttering & Vertical Alignment Quality Checks
Columns carry the entire dead and live loads of your home down to the foundation. Minor defects in column verticality or concrete compaction compromise the structural safety of the entire building.
Column Shuttering and Alignment Check
Before concrete is poured into column formwork, apply this house construction quality checklist section to inspect the shuttering thoroughly: 1. Shuttering Material: Formwork must use 12mm to 16mm waterproof film-faced marine ply or rigid steel plates. Reject warped, split timber planks, which bulge during pouring and produce bent columns. 2. Plumb-Bob (Sahool) Verticality Check: The site engineer or homeowner must drop a heavy plumb-bob from top to bottom on two adjacent faces (X and Y axes) of every column box. Permissible vertical deviation is strictly capped at maximum 3mm over a 3-meter height. 3. Column Cover Blocks (40mm): Fasten 40mm pre-cast concrete or heavy-duty PVC spacers to the rebar cage every 1 meter vertically. This ensures aggregate flows evenly on all sides and keeps reinforcement insulated from moisture and air. 4. Cleanout Window at Base: Ensure the shuttering carpenter leaves a small inspection opening at the base of the column to flush out fallen sawdust, cigarette butts, and loose mortar before sealing and pouring.
Pouring & Compaction Protocol
- Maximum Drop Height: Concrete must not be dropped from a height greater than 1.5 meters (5 feet). Dropping concrete from higher elevations causes heavy coarse aggregate to separate from the cement paste (*segregation*), leading to weak, gravelly patches. - Mechanical Needle Vibrator: Hand-rodding with iron bars is completely inadequate for column casting. Ensure a mechanical needle vibrator (25mm or 40mm needle) is inserted vertically into the fresh concrete at 300mm intervals for 5 to 10 seconds. - Post-Pour Honeycombing Audit: Inspect columns within 24 hours of de-shuttering. If you observe exposed steel bars or stony honeycomb voids (*sarangi*), do not allow masons to simply smear loose plaster over it. Defective honeycombing must be chipped away to sound concrete and repaired using non-shrink structural polymer repair micro-concrete under engineering supervision. - Continuous 14 to 21-Day Wet Curing: Wrap all de-shuttered vertical columns with hessian or jute gunny bags (*bora*). Gunny bags must be kept soaked with water 3 to 4 times daily for a minimum of 14 to 21 consecutive days to achieve design compressive strength.
4. Brick Masonry & Mortar: Civil Work Quality Checks on Site
In an RCC framed building, brick masonry serves as external environmental enclosures and interior room partitions. High-quality masonry ensures acoustic isolation, thermal protection against Lucknow's 45°C summers, and crack-free walls.
Field Tests for Bricks Before Stacking on Site
- Drop Test: Drop a random sample brick from shoulder height (approximately 1.2 meters) onto flat, hard ground. A well-fired Class-I red clay brick will not crack or shatter. - Acoustic Ringing Test: Strike two bricks firmly against each other. High-quality kiln-fired bricks produce a clear, sharp metallic ringing sound (*khankahatt*). A dull thud indicates porous, under-burned clay (*piliya eent*) that will absorb moisture and deteriorate quickly. - Efflorescence Test: Soak a brick in a shallow tray of water until fully absorbed and dried in the shade. If white or grey powdery salt deposits coat more than 10% of the brick's surface, the brick field has excessive alkalis, which will permanently bubble and flake interior paint (*shora*).
Masonry Execution & Workmanship Standards
When reviewing how to check construction quality of a house during masonry, audit these four non-negotiable standards: 1. Frog Position Facing UP: Every red clay brick features an indentation (*frog*) containing the manufacturer brand. Bricks must ALWAYS be laid with the frog facing upward. The wet mortar fills this frog to create a strong mechanical shear key (*chaab*) between successive courses. 2. Mortar Joint Thickness (10mm to 12mm): Joint mortar thickness must be maintained between 10mm and 12mm. Masons frequently lay 20mm to 25mm thick mortar beds to speed up wall height; thick mortar beds reduce wall compressive strength by up to 30% and cause wall tilting. 3. Daily Height Restriction (1.5 Meters Max): Masons must never construct more than 1.5 meters (approximately 5 feet) of wall height in a single working day. Laying full-height walls in one shift compresses the wet lower mortar joints, causing the wall to bow out of plumb. 4. Pre-Soaking and Curing: Red clay bricks must be thoroughly immersed in water tanks for at least 2 hours before laying. Dry bricks instantly suck water out of fresh cement mortar, preventing cement hydration and leaving mortar dry, crumbly, and brittle. Completed walls require twice-daily curing for at least 7 to 10 days.
5. The Pre-Slab Casting & Concrete Pour Inspection Checklist
The day of casting a roof slab is the single most critical milestone in your entire structural timeline. Once concrete is poured, reinforcement or conduit errors are permanently locked in stone. Every plot owner and site supervisor must walk the roof deck and review this complete slab casting inspection checklist—an indispensable pillar of your broader house construction quality checklist—before authorizing the concrete mixer to start.
Centering & Shuttering Quality Check
1. Props Spacing & Base Plates: Steel jacks (*acrow props*) or heavy wooden bullies must be spaced no wider than 1 meter center-to-center. Every prop must sit on a firm wooden sole plate, never on soft, uncompacted earth or loose bricks that can sink under concrete weight. 2. Watertight Formwork Joint Tape: Apply heavy-duty adhesive foam tape or PVC tape over every joint between shuttering ply plates. If gaps exist, precious cement-rich slurry leaks through during vibration, leaving honeycombs and weak porous concrete on the slab ceiling. 3. Cambering: Check that large-span slabs (over 4 meters span) feature an intentional upward camber (3mm to 5mm at mid-span) to compensate for natural structural deflection upon shuttering removal.
Reinforcement Steel Check (IS 456 Standards)
- Main Steel vs. Distribution Steel: Ensure bottom main tension bars are placed along the shorter span direction, with distribution bars crossing over them. Check bar diameter (typically 10mm or 12mm main steel) and center-to-center spacing against the structural blueprint using a tape measure. - Bent-Up / Crank Bars: In continuous slabs, crank bars must bend upward at an angle of 45° at a distance of L/4 or L/5 from the column face to resist negative bending moments over supports. - Mandatory Rebar Chair Spacers: When workers and masons walk over the slab carrying concrete pans or dragging concrete pump hoses, top steel mesh naturally bends downward. Require your contractor to install sturdy 10mm or 12mm steel chair spacers every 1 meter grid. Chairs hold top negative reinforcement at its designed height. - Slab Cover Spacers (20mm–25mm): Pre-cast concrete cover blocks (minimum 20mm for slabs, 25mm for beams) must be placed underneath the steel mesh every 1 meter. Rebar resting directly on the shuttering ply results in exposed steel rusting and water seepage across the ceiling below.
Embedded Electrical & Plumbing Rough-Ins
- Fan Boxes & Downlight Housings: Anchor heavy-duty galvanized iron (GI) fan hooks and downlight housings securely to the rebar cage using binding wire. Stuff fan boxes with paper or foam to prevent wet concrete from filling the housing. - PVC Conduit Continuity: Inspect all heavy-gauge rigid PVC electrical conduits running across the slab deck. Ensure PVC solvent cement is applied to all conduit bends and couplers so pipes do not pop open during concrete vibration.
Concrete Mix Batching, Slump & Cube Tests
1. Design Grade Verification: Ensure the concrete mix complies with design specifications—typically M20 (1:1.5:3) or M25 (1:1:2) for residential roof slabs. If using Ready Mix Concrete (RMC), examine the batching computer printout ticket verifying cement brand, water-cement ratio, and delivery dispatch time (concrete must be poured within 90 to 120 minutes of batching). 2. Concrete Slump Cone Test: Perform an on-site slump cone test (IS 7320). For standard residential slab casting, the slump should measure between 75mm and 100mm. If the slump exceeds 140mm, the contractor has added excessive water to make pouring easier, which drastically slashes compressive strength and creates drying shrinkage cracks. 3. Casting Concrete Test Cubes: Cast a set of at least 6 standard 150mm x 150mm x 150mm concrete cubes during the pour. Store them in water on site and send them to an accredited civil laboratory for compressive strength testing at 7 days (must reach minimum 65% design strength) and 28 days (must reach 100% design strength, e.g., 25 N/mm² for M25). 4. Pond Curing within 24 Hours: Within 24 hours of casting, construct 50mm high cement mortar bunds (*kiaris*) dividing the entire slab roof into small water ponds. Keep water standing continuously at least 2 inches deep for 14 to 21 consecutive days without drying out.
6. Plastering, Crack Prevention & MEP Rough-In Quality Checks
Once the civil shell is erected, interior and exterior wall finishes begin. Crucial civil work quality checks for house construction at this stage prevent hollow plaster sounds, wavy walls, and hairline surface cracks.
Crack Prevention: GI Wire Mesh at RCC-Brick Junctions
Because concrete and brickwork expand and contract at different thermal rates during seasonal temperature changes, straight vertical and horizontal cracks invariably open up along the seams where brick masonry meets concrete columns and beams. - The Solution: Insist on fixing a 6-inch to 8-inch wide Galvanized Iron (GI) chicken wire mesh (or alkali-resistant fiberglass mesh) centered across all RCC-brick joints before applying plaster. - Fasten the mesh using steel nails and washers at 200mm intervals. This distributes thermal stresses and permanently eliminates joint cracking.
Plastering Guides & Right-Angle (Guniya) Inspection
- Button Marks (Bull Marks): Masons must fix 2-inch square cement mortar reference patches (*button marks*) across the entire wall at 1.5-meter intervals using a plumb-bob and aluminum straight-edge (*fatti*). Plaster is then screeded strictly to these button marks, guaranteeing flat, plumb, uniform 12mm to 15mm plaster thickness. - 90-Degree Right Angle (Guniya) Check: Check all interior room corners—especially in the kitchen and bathrooms—using an iron right-angle square (*guniya*). If kitchen corners are even slightly out of 90 degrees, custom modular kitchen quartz countertops and base cabinets will leave unsightly, tapering gaps along the wall. - Concealed Plumbing Pressure Test (7 to 10 Bar): Before plastering or tile installation over concealed CPVC/PPR water supply pipes, conduct a mandatory hydraulic pressure test. Seal all tap outlets and pressurize the pipeline to 7 to 10 bar (100–150 psi) for at least 24 continuous hours using a manual hydraulic test pump. If the pressure gauge drops, locate and repair pipe joint leaks immediately before wall plastering conceals them.
7. Waterproofing & Sunken Slab Ponding: Leakproof Inspection Protocol
Water leakage is the most destructive issue a property owner can face. In our standard house construction quality checklist, waterproofing verification is mandatory before laying any tiles or floor screeds. Repairing a leaking bathroom or terrace ceiling after interior handover costs five times more than doing it right during construction.
Sunken Toilet Slabs
1. Substrate Preparation: Clean the sunken slab floor down to bare concrete. Chip away all loose cement laitance and construct a rounded mortar cove (*vata/gola*) at the 90-degree junction between floor and wall. 2. Two-Coat Polymer Membrane: Apply two cross-directional coats of acrylic or styrene-butadiene polymer-modified cementitious waterproofing coating (e.g., Dr. Fixit Fastflex or SikaTop Seal 107), carrying the coating up the vertical brick walls at least 300mm above the finished floor level. 3. Mandatory 48 to 72-Hour Standing Water Ponding Test: Fill the sunken slab with water up to 4 inches deep. Leave the water ponded for 48 to 72 hours. Inspect the underside ceiling and surrounding room walls below. If any dampness or wet spots appear, drain, re-coat, and re-test before backfilling with lightweight cinder or autoclaved aggregate.
Terrace Waterproofing & Slope Gradient
- Slope Verification (1:100 Gradient): The finished terrace screed must have a minimum slope of 1:100 (1 inch slope per 8 to 10 feet length) sloping directly toward rainwater drain spouts (*parnalas*). Standing puddles on a flat roof guarantee long-term seepage. - Parapet Coving: Cast a 75mm x 75mm smooth 45-degree angle mortar fillet (*vata*) along the perimeter where the terrace floor meets parapet brick walls to prevent water accumulation at the sharp corners.
8. The 50-Point Master Civil Quality Inspection Matrix
Keep this printable 50-point house construction quality checklist matrix handy on your phone when visiting your construction site in Lucknow to track all essential civil work quality checks for house construction:
| Construction Phase | Civil Quality Parameter | Acceptable Standard / IS Code | Failure Consequence |
|---|---|---|---|
| Excavation | Soil strata & pit depth | Virgin soil depth / Min SBC 120 kN/m² | Differential footing settlement |
| Anti-Termite | Chemical spray concentration | IS 6313 (Part 2) / 5 L/m² emulsion | Subterranean termite timber damage |
| PCC Sub-Base | Bed thickness & level | 100mm min M10 (1:4:8 or 1:3:6) | Eccentric loading on footings |
| Footing Steel | Rebar grade & cover | Primary Fe550D / Min 50mm concrete cover | Steel corrosion and foundation spalling |
| Plinth Beam | Stirrup spacing & hooks | IS 13920: 135° seismic hooks / 100mm c/c | Shear failure during earthquake |
| Plinth DPC | Damp proof course band | 50mm M20 + waterproofing liquid + bitumen | Rising capillary moisture (*seelan*) |
| Columns | Plumb verticality (Sahool) | Max 3mm deviation per 3m height | Eccentric column loads & wall tilting |
| Columns | Shuttering & cover blocks | 12mm film-faced ply / 40mm cover | Exposed rebar rusting & honeycombing |
| Columns | Compaction & curing | Needle vibrator / 14–21 days wet gunny | Structural strength deficit of up to 40% |
| Masonry | Brick quality & sound | Metallic ringing / Zero efflorescence | Crumbly walls & peeling interior paint |
| Masonry | Frog orientation & joints | Frog UP / 10mm to 12mm mortar bed | 30% reduction in wall shear capacity |
| Masonry | Daily height limit | Max 1.5m (5 ft) per single work day | Wall buckling & compressed mortar |
| Slab Centering | Prop staging & base sole | Max 1m spacing / Firm wooden sole plates | Shuttering collapse or mid-span sag |
| Slab Steel | Spacing, cranks & chair bars | As per drawing / Chairs every 1m grid | Top rebar displacement & slab cracks |
| Slab Cover | Bottom cover blocks | 20mm to 25mm pre-cast concrete blocks | Exposed rebar rusting on ceiling |
| Concrete Pour | Slump cone workability | 75mm – 100mm slump (IS 7320) | Shrinkage cracks from excess water |
| Concrete Pour | 28-day cube strength | Minimum 20 or 25 N/mm² (IS 456) | Permanent structural load deficit |
| Slab Curing | Continuous pond curing | 50mm water ponds for 14–21 days | Drying micro-cracks & weak slab matrix |
| Plastering | RCC-brick joint mesh | 6"–8" GI chicken wire mesh overlap | Straight vertical/horizontal wall cracks |
| Plastering | Flatness & vertical plumb | Button marks every 1.5m / True plumb | Wavy walls & hollow plaster hollows |
| Plumbing | Concealed pipe testing | Hydraulic pressure test at 7–10 bar (24h) | Internal wall seepage post-handover |
| Waterproofing | Sunken toilet testing | 48–72 hour water ponding test | Ruined false ceilings on lower floors |
| Terrace Roof | Slope & coving | Min 1:100 slope to drain / 75mm coving | Water ponding & ceiling dampness |
9. The Homeowner's Payment Release Rule
Here is the most important commercial advice any structural engineer will ever give you: never release stage payments based on contractor emotional pressure or arbitrary calendar dates.
Contractors often state: *"Sahab, labour wages need to be paid this Saturday, please advance ₹2,00,000."* If you advance money before inspecting the corresponding stage, you lose all leverage to enforce corrections. Once defective concrete cures or faulty plumbing pipes are buried under plaster, fixing them becomes exponentially harder and more expensive.
The 4-Step Milestone Release Protocol
1. Tie Payments Directly to Concrete Milestones: Ensure your construction contract ties every payment tranche to an explicit physical engineering milestone (e.g., Plinth beam completion, Ground floor slab casting, Brickwork completion, Plastering completion). 2. Conduct the Stage Audit: When the contractor claims a milestone is complete, walk the site with this house construction quality checklist to verify each item on the ground. Check vertical plumb lines, cover blocks, curing ponds, and joint mesh. 3. Draft a Punch List of Rectifications: If you discover honeycombing, missing cover blocks, or wavy plaster, issue a written punch list of items requiring rectification. 4. Release Payment Only Upon Sign-Off: Release the milestone funds only after all punch-list rectifications are verified and signed off by your supervising engineer.
10. Partnering with a Quality-First Builder in Lucknow
Conducting daily site audits and coordinating multiple independent vendors requires deep technical expertise, specialized testing equipment, and hours of daily site presence. For working professionals, doctors, businessmen, and NRI plot owners, managing this oversight is often impossible.
At **Swastik Home, our turnkey civil construction service is built from the ground up on transparent engineering integrity: - Certified In-House Civil Engineers: A dedicated, degree-qualified project engineer oversees your site daily, running slump tests, cube tests, and alignment checks at every milestone. - Locked Itemized BOQ: Every single material brand—from Tata Tiscon Fe550D rebar and UltraTech cement to Astral CPVC pipes and Polycab FRLS wiring—is itemized and locked into your contract on day one. - Written 5-Year Structural Warranty**: We stand behind every foundation footing, column framework, and concrete slab with a 5-year written structural stability warranty and complete waterproofing guarantee.
Ready to Build with Complete Peace of Mind?
- Estimate your house construction budget using our **Online Cost Calculator. - Explore our turnkey residential construction packages and structural build standards. - Consult our principal structural engineering team at our regional office: 401, Shopping Square 1, Sushant Golf City, Shaheed Path, Lucknow or call +91 8400468657** to schedule a free plot survey.
Planning a house or villa in Lucknow?
Share the plot locality, approximate area, project type and stage. The team can review your brief and discuss the next step toward a site-specific scope.
Written by Er. Sandeep Mishra, Principal Structural Engineer
Senior civil engineer & project lead at Swastik Home. Providing verified guidelines on building codes, IS:456 standards, and cost optimization in Lucknow.
Need Expert Civil Advice?
Speak directly with our senior structural engineer about your plot layout, foundation requirements, or per-sq-ft rates.
Recent Articles


Building Across Lucknow Sectors
Explore turnkey rates, approved LDA blueprints, and civil execution in your neighborhood:
Ready to Build Your Dream Home in Lucknow?
Swastik Home brings single-source turnkey accountability, verified IS:456 civil engineering, and 100% brand-verified materials with zero budget overruns.
Plan a similar project in Lucknow
Explore the relevant service scope and share your requirements for a project-specific quotation.